The blog has been neglected this last few months in favour of decorating and crafting and its been a lovely break, however i have 'lost' several hundred hrs of my life ill never get back on browsing pinterest for inspiration. Yet i say that like its a bad thing! lol
Here's a few quick and easy Saturdays makes we can all spare the time for to bring some personality into your home with little to no outlay.
Halloween was creeping up on me and i was seriously unorganised this year, i mean who doesn't manage to get a pumpkin on Halloween?? Yeah that's right, ME!! So to make up for my lacking as the Halloween Queen i whipped up these
little bats for the girls. I got the pattern and tutorial from
Pinterest which was free and i simply used whatever fabric scraps i had lying around and some old buttons.
The girls LOVE them and they are super snugly as i used fleece for the back, would your little monsters like a 'scary' pet too??
But of course you always get one that doesn't want what your making so with my thinking cap on i found a tutorial and pattern for a fabric doll but i couldn't let the little lady be naked, and Emma didn't approve so i whizzed up some clothes too from some fabric scraps.
As I've been decorating where i can between Christmas crafting and the sort I've been making some bits for the house from what we already had that wasn't being used.
The french doors in the dining room being a major headache for me as i need to get out a few times a day to tend to the chickens but i also wanted them to look pretty and possibly cosy when needed.
So after much pondering i had a route through my vintage fabrics and found two table cloths that where the perfect size to make into curtains.
i simply hemmed the top on both to be big enough to slip the rod through, i moved it from the outside to the inside of the window as i thought it looked nicer.
then i needed some tie backs to keep them back for easy access to the back so i dug out some large doilies and cut them in half and zig zag stitched the raw edge.
Then i decided to make a new lampshade and after some careful consideration i decided to try my hand at making a doily one. There are loads of tutorials on Pinterest for them and being low cost i thought id give it a go.
I blew a balloon as big as i could get it, i would suggest trying to find the really big ones or like an inflatable beach ball you don't mind sacrificing for a more round shape but either way i love mine.
I simply laid on the doilies and painted over with wallpaper paste.
Then left to dry for 24 hours, i then popped the balloon, some times they will pop themselves once they are fully dry and contract against the doilies.
i cut out the top, carefully, to slip the bulb through and voila! new lampshade!!! i made a full one so had to use string to tie the shade to the fitting but i am currently making an open end one for the lounge so i wont have to tie that one on.
I love how it throws the light out and casts beautiful shapes all through the dining room and into the hall.
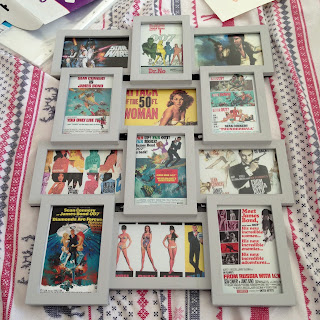
I then decided to up cycle a large, and damaged photo frame to home some James bond post cards my hubby brought home. They are all retro prints so i could resist putting them up.
It was a purple plastic so i simply repainted with a few coats of grey left over emulsion which took great and inserted the prints. it now has pride of place in the lounge.
I also made a dream catcher after seeing a gorgeous tutorial on pinterest for one. i got the large hoops from a local haberdashery for £1.50 for two which turned out to be much cheaper than eBay but i would like to get some really big ones and make another.
I simply wrapped a doily around the frame and hand stitched into place then hung charms and feathers etc from the bottom and hung in our bedroom.
its to cute, i need to make millions!!
Next time id like the bottom to be fuller.
Our stairs window, which i hate as its huge and slightly pointless needed a loving touch so with a lace vintage table cloth that had seen better days i whipped up into a pair of curtains that subtly frame the window making it less imposing on the stairs.
i used a little ribbon and some lace edging to make little tie backs and it took all of 20 mins to hem the top and edges and hang them
And finally, an already repainted table needed a make over from red to something more subtle ready for decorating the lounge next year so i painted it a gorgeous cream tone that i picked a tester pot up of for 20p in our local homebase. it was just and i mean just enough to cover it and i customised it with some pacman star wars images.
A little PVA glue and it looks like a completely new table. it now homes the games consoles again and everyone is happy.
This just proves that with a few pounds, a little imagination and a whole lot of patience you can turn your house into the home you want.
L xx


