Showing posts with label handmade. Show all posts

Monday, 10 February 2014

Lampshade Tutorial Part 1

This is part 1 of 2 Lampshade Upcycle Tutorial. I would of made it one big post, however, both are entirely different and deserve the recognition alone.

This tutorial is for covering a large shade for a floor lamp or ceiling shade that you simply no longer like.

I'm making over a plain cream shade that I bought as a tall floor lamp from Dunelm Mill several years ago, the stand is beautiful but the shade had seen better days and well I couldn't find a replacement so I decided to make it over.

What you'll need:

Fabric. Enough to cover the shade you want to re-cover. I used fabric samples from John Lewis that I had collected over the years. I wanted a cosy yet masculine feel so I chose similar fabrics but mixed up the patterns for texture and well I love the patchwork look! Just make sure you have more than enough fabric to cover the shade, always better to big than not big enough!


 An old shade. Luckily my shade was plain but in all honesty it doesn't really matter either way, well until you switch it on, see Part 2 for an explanation!


Glue.  I used carpet tile spray glue, this stuff is great from being able to peel it back if you get a crease or need to start over. It dries pretty quick and is inexpensive for the quantity. I got a can from B & M for £3.99.

I was having a moment when I decided to take on this make over, I wanted time to relax whilst I was still being productive so I decided to hand stitch the panels together instead of using the sewing machine. A machine would take a few mins to sew all the panels together large enough to cover the shade, hand sewing meant it took me a whole day just to get it large enough. I thoroughly enjoyed this, and you don't have to worry to much if your hand sewing isn't tip top, once its glued on you will never know.
I then ironed the panels to get them nice and smooth ready to adhere to the shade.


Now this can be the tricky part, I ended up covered in spray glue! Lay your fabric wrong side up and lay the shade on top starting at the seam.

Now spray the glue and smooth out, keep going in small sections making sure its all covered in glue and is nice and smooth, now make your way around the shade.

When you get back to the seam, fold over the fabric to give a nice clean edge and glue down well.

Trim the excess fabric and glue around the top and bottom, and voila... your shade is complete!


I adhered mine at an angle and you will too as with the shape it doesn't allow for a straight finish, see part 2 for more info!

Allow to dry and add back to the stand.


Stand back and admire your work, you made that, feel proud!!

Saturday, 8 February 2014

Dreamcatcher DIY


Materials:

Anything round to the size you require.
Embroidery floss
Charms
Cotton
Lace
Crochet doily


1:  Stretch the doily to cover whatever you are using. I found this ring at the local haberdashery, I'm not sure what its used for but anything that can be circular, like a wire coat hanger can work.


2:  I then began to stitch it onto the fame by wrapping the embroidery floss around the frame and through the doily. This part is a little time consuming but it's well worth it for the over all look.


3:  Once you've cover that entire frame you can get creative and stitch on anything you want really, I used some lace and wool and some old semi precious stones and pearls I had left over from something else.

4:  When you are happy with how it looks, sew something that can be used to hang it, put it in place and have sweet dreams!


This is the second one I've made with two different styles, this one now lives in my daughter's bedroom.

I'd love to see what your creativity creates!

L x


Sunday, 27 October 2013

Doctor Who inspired Converse Upcycle Tutorial

We all have a pair of Converse kicking around the place, usually that are at least 5 years old. Ive owned a pink ankle boot pair for almost 10 years now and to be honest (i did wear them everyday for almost 3 years!) still look like they have at least another 10 years in them but in all honesty, i was sick of the sight of them!
And after lusting after these babies for almost 6 months


And after the success of my Dorothy inspired brogues a few birthdays ago.. ( you can find that post here http://insideemmasattic.blogspot.co.uk/2012/02/tutorial-dorothy-inspired-shoes.html )

I knew there was some way i could create my own, unique pair of Doctor Who inspired converse but without breaking the bank!

And voila... I did! It was a lengthy process but here's how it went!!

Supplies:

Blue glitter glue
Old converse
paint brushes

Method:

I basically took out the laces, they had seem better days even with Hello Kitty on them! And grabbed a small paint brush about began around the sole and any other areas i didn't want to get paint on.
(i chose glitter glue as apposed to glue and glitter and the issues i had with the Dorothy ones was that after wearing they would crack, i had my fingers crossed that this wouldn't happen with the glitter glue)


As you can see this was going to be a LOOOOOONG process as it didn't really cover well.

I continued to be careful around the sole but gave in and just painted over the eyelets, with them being metal it didn't adhere well so it does simply peel off, however if you are not as impatient as me then do take care around them.

A few more days and layers later, they began to look a little more like what i had in mind. Do bare in mind it took well over a week for me to complete the painting as with them being canvas they needed the full 24 hrs between layers to allow for full drying or you end up just spreading the glue and glitter around and that's not really what you are going for!


As you can see they are starting to cover well but the colour clumps in areas, don't worry it does all fill in in time.


This is near the end of the painting, i think i put on an extra 2 or 3 coats just to make sure no pink was showing anywhere. they do go stiff but are still comfy to wear, they do move and give they just aren't as 'soft' as they where before the glue but you cant expect them to be.

And finally after a week of painting and drying and some 1" wide blue ribbon they are finally finished!!


Yeah i squeed a bit when i had finished them!!!
You don't have to do your blue, they could be rainbows, or pink or whatever your imagination tells you they should be! 
Go, have fun, be glittery!!

L x


Friday, 2 August 2013

Squirrel and Tiffin craft events 2013


We attended a Squirrel and Tiffin silk screen printing tea party last month and me and the girls had a whale of a time! It was fun and very hands on, there was cake which is always a winner and we met some very lovely people. Linzi is extraordinarily like able and really welcoming to people of all ages, she was great with the kids and it was long enough for them not to get bored, they had ideas on having more than one go! So if you love a project or just want to meet other like minded folk then drop her a call and book onto one of these amazing events shes running. We already have are spots and are particularly looking forward to the Halloween tote bag one!!!

Hope to see some of you there!

Liz xx

Thursday, 30 May 2013

Handmade Rug - A Tutorial

Ive been after a patchwork rug for a while and to get one large enough for my lounge it would easily cost £100+ and to be honest i really didn't want to spend that so i went about seeing if i could make my own with carpet samples.

Tools:

Hot Glue gun
Scissors

Materials:

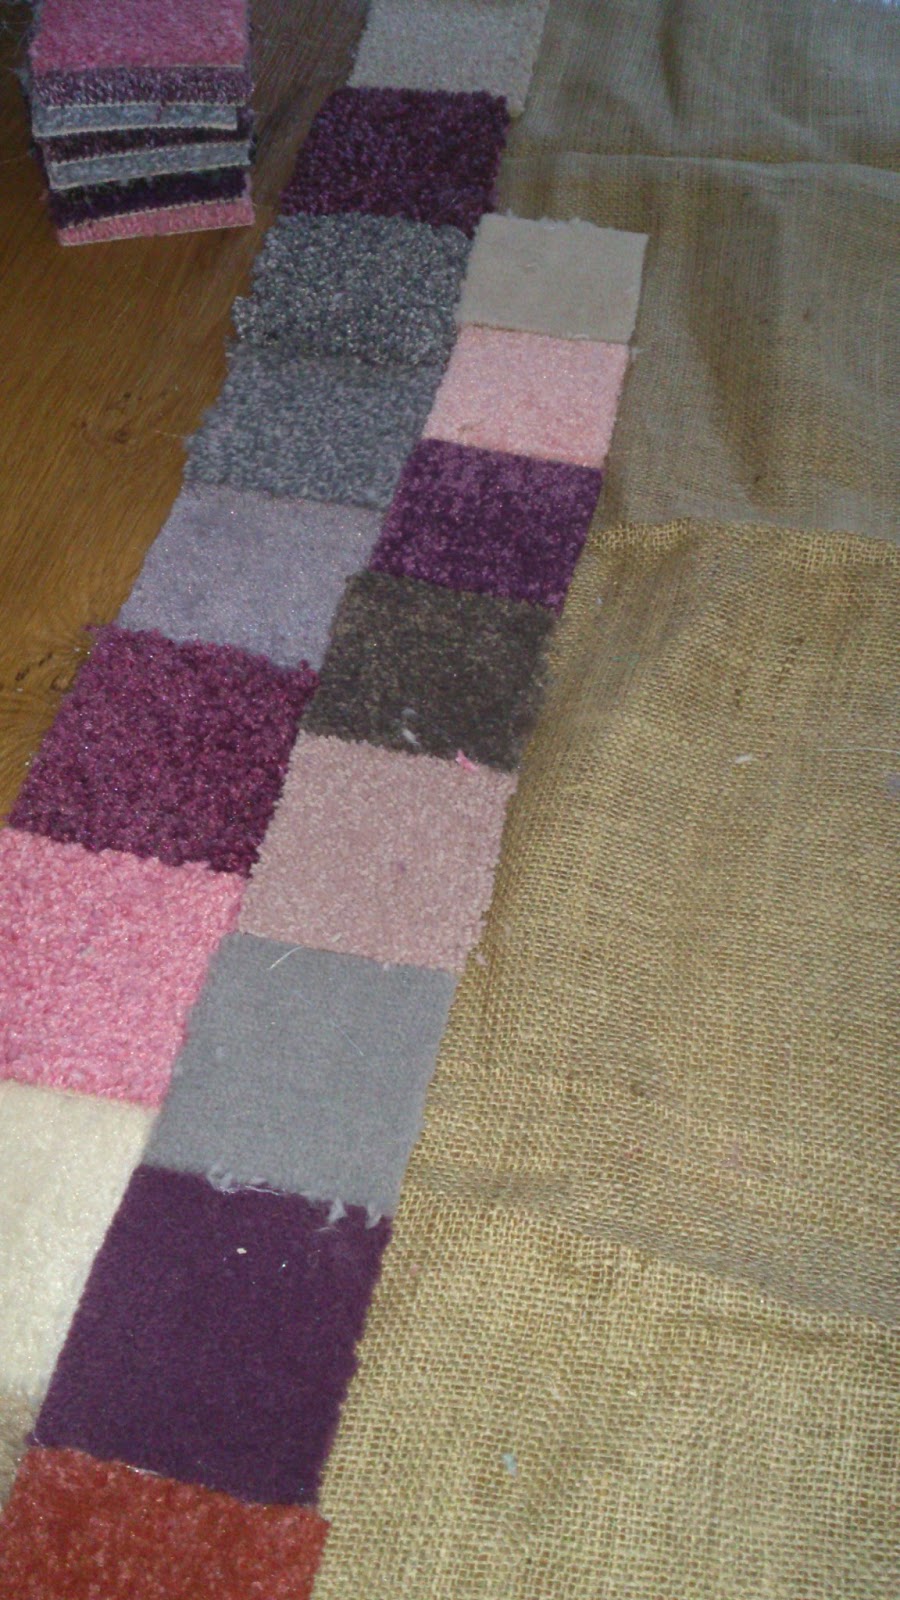
Carpet samples (amount depends on size of rug you are making) (these can be ordered from John Lewis and all leading carpet sellers)
Hessian or similar.

I cut the hessian to the size i wanted, this was just a trial run to see how it looked, if my idea worked and if anything needed taking into account when making it.


I took as many swatches as i need to fit the width of hessian in all the same size, as you'll find they all come in different depths and sizes and began hot gluing them to the hessian.


I did the next row in a different size swatch, for me this didn't really work and when i make my full size one i want to make sure that the samples are all the same type of carpet and all the same size so you don't feel the difference in the carpet when you step on it.


I continued with this until i had filled the hessian. I managed to pull it slightly out of shape when i was gluing so its slightly wonky on my finished piece.
I also glued each piece to each other as well as the hessian or it moves under foot, this keeps each piece in place.


Its found its home in front of the cooker, stops my toes getting cold when I'm cooking. It looks great but going forward i know what needs to be changed, also id place them an inch inside to allow for a binding round the edge on the rug as they are now, after using for a week and being hoovered, have began to frey around the raw edges.

Hope you give this a go too even if its just for an entrance mat, hessian is just a few pounds a meter and the carpet samples are completely free just don't be as impatient as i was for giving it a go because it takes a lot more than you expect to make one a decent room size. * Goes back to hoarding carpet samples*


L xx

Table to bench tutorial

After perusing Pinterest as ya do, I fell across several tutorials for refashioning tables into seating and  luck would have it we needed a seated bench for the girls AND we had a vintage table hiding out in the shed that we hadn't used for a while so i popped on down to Dunelm Mill for some foam and dug out a vintage toddler bed duvet cover that didn't fit the girls bed anymore and i got to work with my staple gun and my trusty hot glue gun.


 Here's my lovely, and very long vintage coffee table. I think I would of liked to have painted the legs first but I also love the retro wood.

I cut the foam, which is 1 inch thick to fit and hot glue gunned the foam to the top of the table.


I didn't over hang the foam as many of the other tutorials say purely because i didn't have enough foam in one piece and secondly because Dunelm Mill didn't stock foam large enough to cover it in one go and i didn't want to have a seam down the middle.


This is the gorgeous fabric used from the vintage bedlinen, half was large enough to fold in half and staple down with enough overhang which has covered the colour of the foam perfectly and added a little more comfort.


And finally here is the final look!!

I love it!! AND its comfy which took me by surprise if I'm honest. I hope to make another one with a 6 inch foam and large enough to have an over hang that i can use in the hall way for putting on shoes etc, a really easy craft, only took me an hour start to finish and really cheap, was just £6 for the foam and everything else i had.

Give it a go, a really lovely addition to the home and practical to.

L xx

Thursday, 16 May 2013

Upcycling? new trend or are we all just broke?

There has always being many reasons why people make do and mend, from simply not having any money to being more Eco friendly with how we live but with this new trend on the increase do we do it out of necessity or simply to keep up with the Jones'?
Personally its been a mixture of both for many years starting back when my husband lost his job, we went from a full time wage to nothing in what seemed like over night so all the luxuries of eating out and new clothes whenever i felt like a pick me up where the first things to go but as time went on i fell in love with all aspects of making do with what we already had from re purposing furniture or old towels and bedding to passing down clothes through our daughters and the excitement they got from getting something new.
Now its become more of a hobby for me and in the back of my mind a business opportunity as everything i find stuffed in the back of a cupboard or abandoned on a shelf i find myself imagining all sorts of alternative uses for it.
The girls love seeing mine or even their unloved clothes turned into something fun and individual as they are clothing and almost worn out shoes turned into sparkly creations and the scraps whipped into dolls/ teddies new clothes, who doesn't see the fun in that and with the millions of people all over the world loosing days perusing Pinterest there is no end of inspiration for that old table you've been putting off taking to the charity shop for three months and knowing something that has gone unloved for so long is now something that has become a firm favourite around your home is real good for the soul not to mention the wallet!

So here is a little look at what I've been upto recently..

I found a tutorial on pinterest about upcycling tshirts, this one i split up the back and inserted some floaty fabric, instead of being a body hugging jersey t its a more relaxed look.

 Sadly my fave doctor who t had shrunk in the wash *yeah I'm sticking with that reason* so i split the side seams and inserted a 6 inch wide band of star fabric which is taken from a pair of old pj bottoms and bobs ya uncle its a loose fitting t.
 This gorge river island cardi that i had never worn because i didn't like the neck is now wearable as I've added a cream crocheted collar, again which i had never used.
 Same again with my fave etsy bought tshirt it had suddenly got a bit on the tight side, its now more comfy and i can get back to wearing it after adding a 4 inch side band
 Surprisingly this cute jersey pencil skirt, started life as an old pair of pj bottoms, who'd have thunk it eh!
 We have all seen the epic tutorials on pinterest for upcycling a pair of old cowboy boots, i simply adapted it to do my old tan boots, added some fabric scraps, old belts and some other bits and bobs!

There is also a converse boot upcycle coming soooooon!!!

So tell me... why do you upcycle or make do and mend??

L x


Saturday, 22 December 2012

Map print lampshade tutorial

I saw a tutorial for a map print, paper covered lampshade on Pinterest a few months back and its been bugging me as i knew i wanted to give it a go.
So i popped to homebase and grabbed a small white paper lampshade which was about £1.90 give or take a few pence.
Then i found a gorgeous sepia print of an old fashioned map on the interenet and printed out about 50, cut them out then in half.


I used about half a tube of this UHU all purpose glue to cover the whole sade, i just put a line of the glue along the straight edge and started fixing them from the bottom up, layering them as i went.


It took a few hours to fully cover the sade but i couldnt be more happier with the how it turned out and it has taken pride of place in our lounge. I'm planning on doing a much larger one next time for the hall.
I could get addicted to this :)


L xx

Saturday Make

With it being the last Saturday before Christmas i wanted to take things easy and slob out in front of the TV but my creativity got the better of me and before lunch time i just couldn't sit still so i raided my stash of "don't wear so need to refashion" pile and grabbed a few tops and tshirts and my bag full of fabric pens and paint that the lovely folk over at bottletoppr sent me and i got to work.
First i printed out some silhouettes of anything i could find that took my fancy and i used my craft knife to cut out a stencil.
i then just kinda went with it...

 Silver deer
 Black Doctor Who 
 I free handed this after seeing a tshirt i want with this printed on, it hasn't turned out as well as i had hoped though.
 Red gloss moustaches

 silver deer to the side
 Purple top hat and bow tie with a silver moustache
Glitter silver bowler hats

This is such a fun and inexpensive craft, you can make or customise your own clothes or buy a plain cheap scarf or shawl and print something on it for gifts, you could even go as far as socks and underwear if your creative talent runs pretty deep :)
I also cant wait to let the kids go wild with this on some plain tshirts.

L xx

Wednesday, 12 December 2012

My handmade home

The blog has been neglected this last few months in favour of decorating and crafting and its been a lovely break, however i have 'lost' several hundred hrs of my life ill never get back on browsing pinterest for inspiration. Yet i say that like its a bad thing! lol

Here's a few quick and easy Saturdays makes we can all spare the time for to bring some personality into your home with little to no outlay.

Halloween was creeping up on me and i was seriously unorganised this year, i mean who doesn't manage to get a pumpkin on Halloween?? Yeah that's right, ME!! So to make up for my lacking as the Halloween Queen i whipped up these little bats for the girls. I got the pattern and tutorial from Pinterest which was free and i simply used whatever fabric scraps i had lying around and some old buttons.
The girls LOVE them and they are super snugly as i used fleece for the back, would your little monsters like a 'scary' pet too??


But of course you always get one that doesn't want what your making so with my thinking cap on i found a tutorial and pattern for a fabric doll but i couldn't let the little lady be naked, and Emma didn't approve so i whizzed up some clothes too from some fabric scraps.


As I've been decorating where i can between Christmas crafting and the sort I've been making some bits for the house from what we already had that wasn't being used.
The french doors in the dining room being a major headache for me as i need to get out a few times a day to tend to the chickens but i also wanted them to look pretty and possibly cosy when needed.
So after much pondering i had a route through my vintage fabrics and found two table cloths that where the perfect size to make into curtains.
i simply hemmed the top on both to be big enough to slip the rod through, i moved it from the outside to the inside of the window as i thought it looked nicer.
then i needed some tie backs to keep them back for easy access to the back so i dug out some large doilies and cut them in half and zig zag stitched the raw edge.


Then i decided to make a new lampshade and after some careful consideration i decided to try my hand at making a doily one. There are loads of tutorials on Pinterest for them and being low cost i thought id give it a go.
I blew a balloon as big as i could get it, i would suggest trying to find the really big ones or like an inflatable beach ball you don't mind sacrificing for a more round shape but either way i love mine.
I simply laid on the doilies and painted over with wallpaper paste.


Then left to dry for 24 hours, i then popped the balloon, some times they will pop themselves once they are fully dry and contract against the doilies.
i cut out the top, carefully, to slip the bulb through and voila! new lampshade!!! i made a full one so had to use string to tie the shade to the fitting but i am currently making an open end one for the lounge so i wont have to tie that one on.


I love how it throws the light out and casts beautiful shapes all through the dining room and into the hall.

I then decided to up cycle a large, and damaged photo frame to home some James bond post cards my hubby brought home. They are all retro prints so i could resist putting them up.
It was a purple plastic so i simply repainted with a few coats of grey left over emulsion which took great and inserted the prints. it now has pride of place in the lounge.


 I also made a dream catcher after seeing a gorgeous tutorial on pinterest for one. i got the large hoops from a local haberdashery for £1.50 for two which turned out to be much cheaper than eBay but i would like to get some really big ones and make another.
I simply wrapped a doily around the frame and hand stitched into place then hung charms and feathers etc from the bottom and hung in our bedroom.
its to cute, i need to make millions!!


Next time id like the bottom to be fuller.

Our stairs window, which i hate as its huge and slightly pointless needed a loving touch so with a lace vintage table cloth that had seen better days i whipped up into a pair of curtains that subtly frame the window making it less imposing on the stairs.
i used a little ribbon and some lace edging to make little tie backs and it took all of 20 mins to hem the top and edges and hang them


And finally, an already repainted table needed a make over from red to something more subtle ready for decorating the lounge next year so i painted it a gorgeous cream tone that i picked a tester pot up of for 20p in our local homebase. it was just and i mean just enough to cover it and i customised it with some pacman star wars images.


A little PVA glue and it looks like a completely new table. it now homes the games consoles again and everyone is happy.

This just proves that with a few pounds, a little imagination and a whole lot of patience you can turn your house into the home you want.


 L xx