Showing posts with label DIY. Show all posts

Monday, 10 February 2014

Lampshade Tutorial Part 1

This is part 1 of 2 Lampshade Upcycle Tutorial. I would of made it one big post, however, both are entirely different and deserve the recognition alone.

This tutorial is for covering a large shade for a floor lamp or ceiling shade that you simply no longer like.

I'm making over a plain cream shade that I bought as a tall floor lamp from Dunelm Mill several years ago, the stand is beautiful but the shade had seen better days and well I couldn't find a replacement so I decided to make it over.

What you'll need:

Fabric. Enough to cover the shade you want to re-cover. I used fabric samples from John Lewis that I had collected over the years. I wanted a cosy yet masculine feel so I chose similar fabrics but mixed up the patterns for texture and well I love the patchwork look! Just make sure you have more than enough fabric to cover the shade, always better to big than not big enough!


 An old shade. Luckily my shade was plain but in all honesty it doesn't really matter either way, well until you switch it on, see Part 2 for an explanation!


Glue.  I used carpet tile spray glue, this stuff is great from being able to peel it back if you get a crease or need to start over. It dries pretty quick and is inexpensive for the quantity. I got a can from B & M for £3.99.

I was having a moment when I decided to take on this make over, I wanted time to relax whilst I was still being productive so I decided to hand stitch the panels together instead of using the sewing machine. A machine would take a few mins to sew all the panels together large enough to cover the shade, hand sewing meant it took me a whole day just to get it large enough. I thoroughly enjoyed this, and you don't have to worry to much if your hand sewing isn't tip top, once its glued on you will never know.
I then ironed the panels to get them nice and smooth ready to adhere to the shade.


Now this can be the tricky part, I ended up covered in spray glue! Lay your fabric wrong side up and lay the shade on top starting at the seam.

Now spray the glue and smooth out, keep going in small sections making sure its all covered in glue and is nice and smooth, now make your way around the shade.

When you get back to the seam, fold over the fabric to give a nice clean edge and glue down well.

Trim the excess fabric and glue around the top and bottom, and voila... your shade is complete!


I adhered mine at an angle and you will too as with the shape it doesn't allow for a straight finish, see part 2 for more info!

Allow to dry and add back to the stand.


Stand back and admire your work, you made that, feel proud!!

Saturday, 8 February 2014

Dreamcatcher DIY


Materials:

Anything round to the size you require.
Embroidery floss
Charms
Cotton
Lace
Crochet doily


1:  Stretch the doily to cover whatever you are using. I found this ring at the local haberdashery, I'm not sure what its used for but anything that can be circular, like a wire coat hanger can work.


2:  I then began to stitch it onto the fame by wrapping the embroidery floss around the frame and through the doily. This part is a little time consuming but it's well worth it for the over all look.


3:  Once you've cover that entire frame you can get creative and stitch on anything you want really, I used some lace and wool and some old semi precious stones and pearls I had left over from something else.

4:  When you are happy with how it looks, sew something that can be used to hang it, put it in place and have sweet dreams!


This is the second one I've made with two different styles, this one now lives in my daughter's bedroom.

I'd love to see what your creativity creates!

L x


Monday, 27 January 2014

DIY Bedroom Makeover Done in a Day!

After how well my stairs makeover went ( you can find it here ) I seem to have caught the decorating bug and next on my list was our bedroom.
Its not a massive space and often ends up being a dumping ground for bedding I have no storage for or unwanted toys (at least that part never lasts!)
So this makeover is just the first part to transforming our bedroom from glorified closet to master bedroom of joy!
I'm attempting to over haul the whole house on a teeny tiny budget, and this makeover is something we can all do for literally nothing, I have used wallpaper samples collected over a few months from online stores like Farrow and Ball and John Lewis or you can simply pop on down to B and Q or any other store that sells wallpaper and collect some samples of all the paper you like. Don't worry if there is no theme, if the colours clash or you have mixed bold patterns with muted florals, who cares!
This is all about just going with what you like and the fun is in not having to live with just one pattern or colour until you decorate again and who can afford £55 per roll of paper for something you may stop loving within the year.
I already had the white paint and wallpaper paste. I always use the premixed tubs ( £1.99 from B and M Bargains) so i don't have to mix up a massive batch to find I don't need it all.

So here's how it went..


The walls where boring old magnolia still from when we moved in, it really has been neglected!
They where pretty dirty now and needed refreshing so I've just painted them all white, can't beat it to lift a room and fill it with natural light.


Here is my stash of wallpaper samples, scrapbooking paper and those cute papers you sometimes get for free in craft magazines. Anything like this is suitable to use really just be careful when applying to the wall in case you rip the paper.


So I got itchy feet waiting for the paint to dry so i started papering.


It progresses quickly and you would be surprised how quickly you can fill a whole wall like this. I didn't follow a theme or anything but I did find when I was putting them up I had a lot of similar colours so I tried to mix it up as much as possible.


I stopped at half way for a brew break, this took about an hour and gave the paint on the other walls to dry from they first coat.


2 hours later and I'd filled the wall and given the walls another coat. I just love it, even more than the one I did in the kitchen last year! I do believe it's the kids room next!!!

It really is a wallet friendly style statement, I have had so many compliments just from posting to Instagram yesterday and our bedroom finally feels like somewhere I can lay and relax after a long day ( that is if you ignore the pile of boxes in the corner ear marked to live in the loft!)

If you decide to give this a go, do tweet me your gorgeous pics! @immamabetty

Happy Monday folks ;)

L x


Tuesday, 29 October 2013

Room Revival - The play room


Autumn for me is like Spring, it creates a sense of calm and i shift down a gear and float through the next few months simply enjoying the weather, the cosy nights and the comfort food and dare i even say it be the whole lead up to Christmas.
Watching my daughters become over whelmed with excitement at the prospect of a fat, hairy man, entering our home and leaving behind a mountain (they wish!) of presents they have be removing and adding to a list for a good three months prior.
Its also a time of year that i begin to nest build, i get this overwhelming urge to strip every room of unnecessary 'clutter' and redecorate it within an inch of its life, is that just me???? ( you must all think I'm mental!)
High up on my list of, 'Seriously must get done before the fat hairy man arrives' was the playroom. It used to be my office as with having 3 daughters no one ever wants to sleep alone so we have always had a 'spare' room.
I had painted it light pink and wallpapered a few years ago but after the girls had been using the room it looked tired and kinda MEH!
So i whipped out the rollers and some white paint and i got to work.

Sadly, like an idiot i had forgotten to take any before photos. But here in all its glory is the new room..


Its not the biggest room so the space had to work for us. The wall unit is from ikea and it comes with two sets of 2 drawers and 2 cupboards plus 12 squares that are large enough for storage baskets.


Even with all the toys they have there is a spare square and i used the spaces to display their things instead of hiding them away. Behind the cupboards are their books as well, children never put books away tidily. And in the drawers is Lego as that's another thing that literally gets EVERYWHERE! The unit is surprisingly sturdy and the best quality unit i think i have ever bought in this type of style.


The plastic table and chairs is also from ikea, i was surprised how large they are in all honesty as children's furniture tends to be on the smaller size which is a pain for our eldest.
They where really easy to put together and a really fab price.


This little corner is behind the door and not a very large space but i put their rolling storage box from Vertbaudet, it looks like a pram so it holds all their build a bear and doll clothes and accessories and i made them this cute dolls house from an old bookcase as most dolls houses aren't big enough to get 3 in front of. i plan to use some wash tape to create a background and a roof for it also.


You can find all the furniture here

http://www.ikea.com/gb/en/catalog/products/20099496/
http://www.ikea.com/gb/en/catalog/products/70169533/#/00168650
http://www.ikea.com/gb/en/catalog/products/S89000964/
http://www.vertbaudet.co.uk/storage-chest-white.htm?ProductId=705023055&FiltreCouleur=0019&t=6    This isn't the same one as we have as its old stock but there are some lovely new designs to choose from, i especially like the one I've added the link to


L x


Sunday, 27 October 2013

Doctor Who inspired Converse Upcycle Tutorial

We all have a pair of Converse kicking around the place, usually that are at least 5 years old. Ive owned a pink ankle boot pair for almost 10 years now and to be honest (i did wear them everyday for almost 3 years!) still look like they have at least another 10 years in them but in all honesty, i was sick of the sight of them!
And after lusting after these babies for almost 6 months


And after the success of my Dorothy inspired brogues a few birthdays ago.. ( you can find that post here http://insideemmasattic.blogspot.co.uk/2012/02/tutorial-dorothy-inspired-shoes.html )

I knew there was some way i could create my own, unique pair of Doctor Who inspired converse but without breaking the bank!

And voila... I did! It was a lengthy process but here's how it went!!

Supplies:

Blue glitter glue
Old converse
paint brushes

Method:

I basically took out the laces, they had seem better days even with Hello Kitty on them! And grabbed a small paint brush about began around the sole and any other areas i didn't want to get paint on.
(i chose glitter glue as apposed to glue and glitter and the issues i had with the Dorothy ones was that after wearing they would crack, i had my fingers crossed that this wouldn't happen with the glitter glue)


As you can see this was going to be a LOOOOOONG process as it didn't really cover well.

I continued to be careful around the sole but gave in and just painted over the eyelets, with them being metal it didn't adhere well so it does simply peel off, however if you are not as impatient as me then do take care around them.

A few more days and layers later, they began to look a little more like what i had in mind. Do bare in mind it took well over a week for me to complete the painting as with them being canvas they needed the full 24 hrs between layers to allow for full drying or you end up just spreading the glue and glitter around and that's not really what you are going for!


As you can see they are starting to cover well but the colour clumps in areas, don't worry it does all fill in in time.


This is near the end of the painting, i think i put on an extra 2 or 3 coats just to make sure no pink was showing anywhere. they do go stiff but are still comfy to wear, they do move and give they just aren't as 'soft' as they where before the glue but you cant expect them to be.

And finally after a week of painting and drying and some 1" wide blue ribbon they are finally finished!!


Yeah i squeed a bit when i had finished them!!!
You don't have to do your blue, they could be rainbows, or pink or whatever your imagination tells you they should be! 
Go, have fun, be glittery!!

L x


Thursday, 30 May 2013

Handmade Rug - A Tutorial

Ive been after a patchwork rug for a while and to get one large enough for my lounge it would easily cost £100+ and to be honest i really didn't want to spend that so i went about seeing if i could make my own with carpet samples.

Tools:

Hot Glue gun
Scissors

Materials:

Carpet samples (amount depends on size of rug you are making) (these can be ordered from John Lewis and all leading carpet sellers)
Hessian or similar.

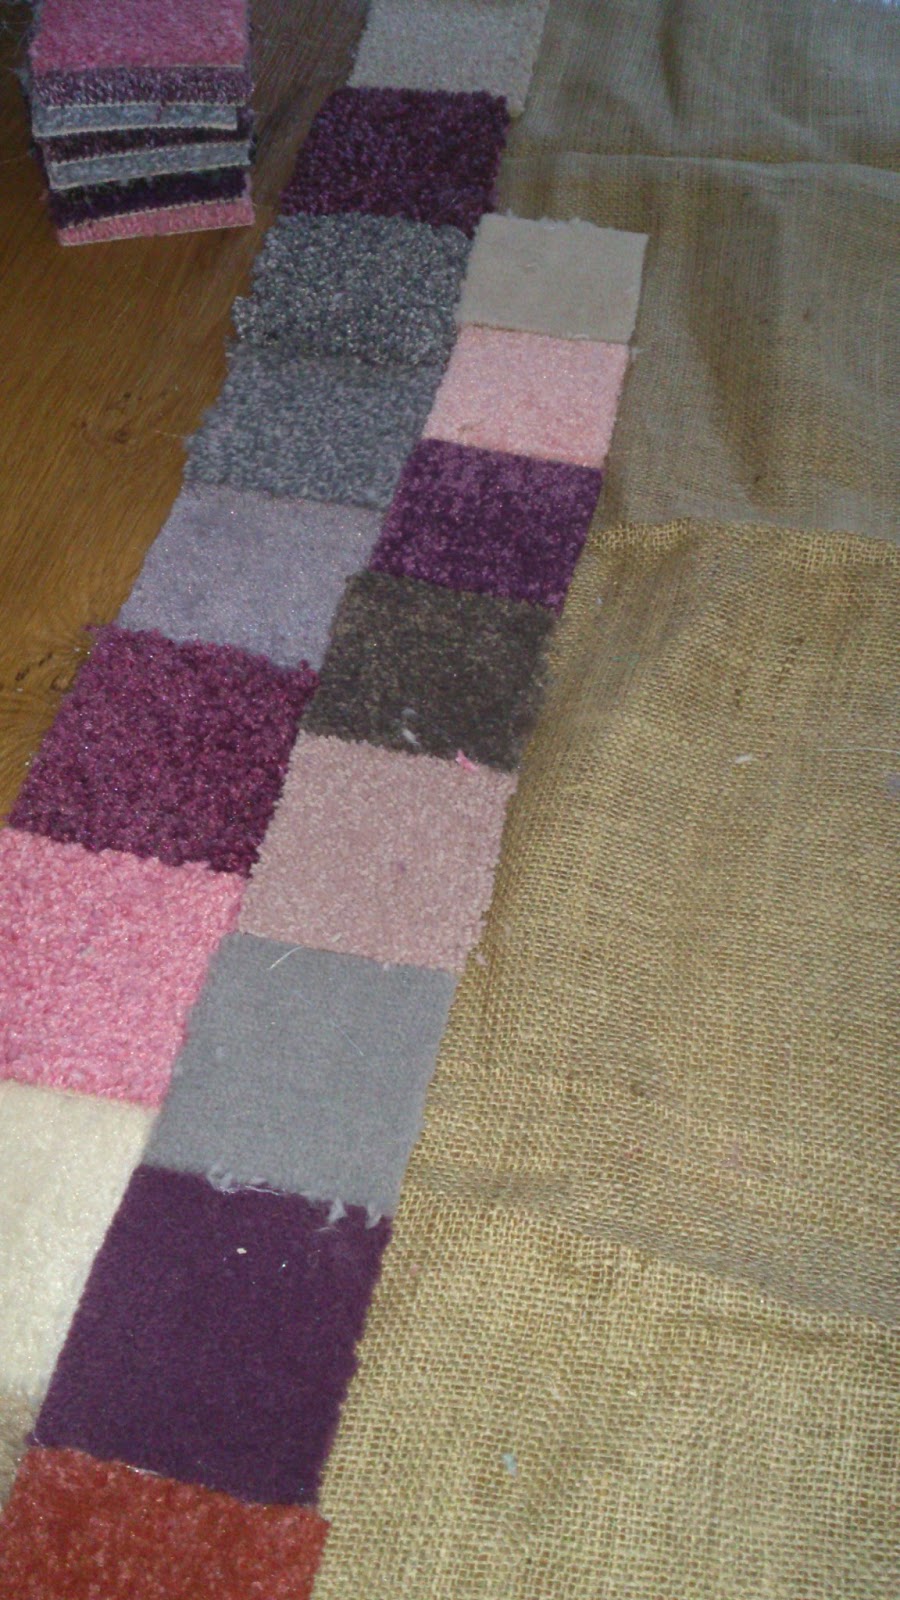
I cut the hessian to the size i wanted, this was just a trial run to see how it looked, if my idea worked and if anything needed taking into account when making it.


I took as many swatches as i need to fit the width of hessian in all the same size, as you'll find they all come in different depths and sizes and began hot gluing them to the hessian.


I did the next row in a different size swatch, for me this didn't really work and when i make my full size one i want to make sure that the samples are all the same type of carpet and all the same size so you don't feel the difference in the carpet when you step on it.


I continued with this until i had filled the hessian. I managed to pull it slightly out of shape when i was gluing so its slightly wonky on my finished piece.
I also glued each piece to each other as well as the hessian or it moves under foot, this keeps each piece in place.


Its found its home in front of the cooker, stops my toes getting cold when I'm cooking. It looks great but going forward i know what needs to be changed, also id place them an inch inside to allow for a binding round the edge on the rug as they are now, after using for a week and being hoovered, have began to frey around the raw edges.

Hope you give this a go too even if its just for an entrance mat, hessian is just a few pounds a meter and the carpet samples are completely free just don't be as impatient as i was for giving it a go because it takes a lot more than you expect to make one a decent room size. * Goes back to hoarding carpet samples*


L xx

Table to bench tutorial

After perusing Pinterest as ya do, I fell across several tutorials for refashioning tables into seating and  luck would have it we needed a seated bench for the girls AND we had a vintage table hiding out in the shed that we hadn't used for a while so i popped on down to Dunelm Mill for some foam and dug out a vintage toddler bed duvet cover that didn't fit the girls bed anymore and i got to work with my staple gun and my trusty hot glue gun.


 Here's my lovely, and very long vintage coffee table. I think I would of liked to have painted the legs first but I also love the retro wood.

I cut the foam, which is 1 inch thick to fit and hot glue gunned the foam to the top of the table.


I didn't over hang the foam as many of the other tutorials say purely because i didn't have enough foam in one piece and secondly because Dunelm Mill didn't stock foam large enough to cover it in one go and i didn't want to have a seam down the middle.


This is the gorgeous fabric used from the vintage bedlinen, half was large enough to fold in half and staple down with enough overhang which has covered the colour of the foam perfectly and added a little more comfort.


And finally here is the final look!!

I love it!! AND its comfy which took me by surprise if I'm honest. I hope to make another one with a 6 inch foam and large enough to have an over hang that i can use in the hall way for putting on shoes etc, a really easy craft, only took me an hour start to finish and really cheap, was just £6 for the foam and everything else i had.

Give it a go, a really lovely addition to the home and practical to.

L xx

Thursday, 2 August 2012

Curtain revamp

Since closing La Chic Unique, i have spent a lot of time finally getting my house decorated and primped and preened into the home i want, my budget has been very small and being as frugal as i am most of our now very priced possessions are preloved.
The man of the house has had an almost obsessive hate about the blinds we have had up since we moved in over 2 years ago so i bit the bullet and tried to find a pair of cute curtains for our newly decorated lounge.
I had wanted some gorgeous taffeta ones, to the floor in a rich cream but sadly these have been out of my budget due to the size of my window! So, as a last ditch attempt to find something as a stop gap i grabbed a pair of vintage floral ones from the local charity shop for a mere £2.
They where cream with a cute floral pattern but with a hideous frill. He hated them and i wasn't a huge fan but they fit beautifully and are gorgeously made and have done the job for the last few months.
However with a little to much time to kill one afternoon i figured enough was enough and something had to be done about them. With autumn fast approaching i have dreamt up this gorgeous cosy lounge for evening snuggles and movies and i went ahead with giving the curtains a make over as my starting point for my autumn cosy hideaway.

I started off with carefully cutting the frill off as close as possible to the seam, with its satin pink strip it reminded me of my grandmas bedroom curtains when i was 6 i still shudder at the thought lol!

Then i used a Dylon Ruby Red machine dye to , fingers crossed, dye them to something that would frame the window instead of give me nightmares.
I had hoped for a really deep red tone to them as the walls are painted a soft grey tone and we have white nets up to the window.
Having been through the washer twice and a few hours drying they have been transformed into these...

As you can see from the photo the colour is a lot lighter than i hoped but they are not 100% cotton so i didn't expect them to be very true to colour, not to mention the pattern! Even though you can still see it on close inspection, when the light floods into the room they turn a gorgeous deep shade against the bright white of the window nets and the light grey walls.

I rehung them the wrong way round so the outer seam would be on the meeting side of the curtain so they now look like a completely  new set of curtains. Ive had two fabulous reactions when i said they where the same curtains, no one can believe five Min's with a pair of shears and a fabric dye can make such a huge difference to a room, i cannot be happier, not only did it not cost me a whopping £100 for a fabulous pair of curtains but i didn't even need to buy a new pair.


And here my window is, with my gorgeous vintage sun catchers up, i love them more than i ever thought i would and with the ease of use of the Dylon fabric dyes i will defo be reworking more in the future!!
Thanks Dylon for the stunning new curtains, i hope you approve.


L xx

Thursday, 23 February 2012

TUTORIAL: Lace covered Candle holders

Theres nothing like sitting by candle light but fancy holders are always expensive, however pretty they are!
This tutorial will show you how to create your own using items you have in your craft box or just around the house.

SUPPLIES:

Glass jar (large with a wide neck or a small one would work to perfectly)
Ribbon/lace/fabric
mod podge (or homemade which is just half pva glue and half water, and mix)
and a small paint brush

Step 1: Wash your glass jar making sure you remove all/any label that may be stuck to it.

Step 2: Dry thoroughly

Step 3: Measure your glass jar and cut your prefered fabric of choice to the right length, making sure the ends touch and only just over lap, or not at all if possible and this will give you a better finish.

Step 4: Coat your jar with the pva and water mixure.

Step 5:Carefully lay the fabric youve chosen (i chose a pale pink lace trim as i had plenty spare to make a few with and i have a huge thing for lace at the mo!) onto the pva/water mix and line it up with the bottom on the jar, pressing down and making sure its level all the way round


step 6: Cut another piece of your chosen fabric and repeat the process. I used the natural curve of the lace to match the pieces together for a unified look.


Step 7: Apply more strips until the glass is completely covered from top to bottom and you are happy with how it looks. Now cover entirely over the top with the pva/water mix to ensure every part of the fabric is covered, the fabric may shift slightly at this point so be careful not to twist or upset your design.

Step 8: Now leave to dry for a few hours then turn over, otherwise all the glue will run down to the end its stood on, this allows the glue to distribute evenly giving and smooth look at the end. Now leave over night to fully dry.

Step 9: Insert your tea light and enjoy!! (you could also use the wide church candles in a lovely wide jar)


I hope to see you all creating these beauties!! They would be great outside in the summer at BBQ's or for center pieces at weddings etc.

L x

Wednesday, 22 February 2012

TUTORIAL: DIY Vintage Necklace

We all like something a little different when it comes to jewellery so why not give this really easy Ribbon Necklace Tutorial a go and create your own one off piece...

Recycle Vintage chocker tutorial

Tools and equipment:

2 meters of 2cm wide satin ribbon
Ribbon ends with a hoop
Pliers
Cutters or another pair of pliers
Broken piece of vintage jewellery
(i used a large ornate bracelet that was missing some stones that i could get replacements for but any charm with side hoops will work)
2 jump rings and a matching clasp
A short piece of chain and a single bead or charm of your choice
1 head pin


1:  Cut your satin ribbon into two equal lengths and press so smooth out any kinks you may have. Mine was taken for an old item of clothing so needed ironing before use.

2:  I used my pliers and cutters to pry the smaller of the charm off the bracelet. You may simply just need to use the cutters or pliers to cut off or open a jump ring.

3:  Thread the ribbon around the open side bars and pull through so they are of equal lengths on both sides.

4:  Neaten the edges of the ribbon if required and pop the end caps on and close tight with your pliers and pull the ribbon to ensure it doesn't slip through, use super glue or hot glue gun to secure the ribbon in place if required.

5:  Attach your jump rings to either hook at the end of your ribbon and attach the clasp to one side.

6:  On the opposite side attach your short length of chain.

7:  Pop your head pin through your bead, if using a charm just attach a smaller jump ring to the top and attach to your chain,  hoop it round and attach to the stretch of chain.

8:  Fasten and wear with pride!!!

Monday, 9 January 2012

The Gardening Book by Jane Bull

I don't usually buy new books, i prefer finding discarded gems in local charity shops or on ebay but whilst wasting half an hour yesterday afternoon whilst in town this caught my eye in Tk Maxx and at just £1 in the sale i couldn't say no.


This caught my eye for more than one reason and it wasn't because it was a pound hahaha We love gardening and grow a lot of fruit and veg in the summer and the girls really love getting stuck in and the thought of being able to draw some inspiration from it for Home Ed as well as growing in the colder months i grabbed it!
There are loads of lovely little DIY projects that really take gardening to a whole new level I've never thought of before and i I've chosen two of my favourites for you to have a little look at.
Perfectly simple even for the youngest of green fingered boys and girls, fun AND educational.


The first being these totally cute little jar lid decorations, the kids can completely customise them to their own likes and physically watch the cress grow right there around their little environment.

And this one appealed to my naughty boy side, making like a King Kong tile scenario surrounded by plants that they have actually grown.
The tutorials are filled with loads of lovely pictures even children can follow and all there 'To Buy' lists are realistic and you probably already have them around the home or garden.
And lastly its a perfect way or recycling unwanted or unplayed with toys and if your little treasures can't bring themselves to donate something to their very own garden then pop along to your local charity shop and pick up a few bits for pennies and hey presto...DIRTY FUN!
Cant wait to see what you come up with!!

L x